Finally, finally, finally!! I figured out what to do with the gorgeous beads that I received from Beaded Lily, thanks to my good friend Jean Yates! And now is the perfect month to share the project with you since it's officially Seed Bead Month (according to me, anyway).
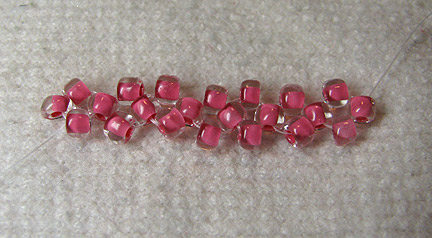
Here is what I came up with for three: since I didn't want my beadwork to overwhelm the beauty of these beads, I made an embellished right angle weave (RAW) rope. There are dozens of different ways that I've seen these ropes embellished, and now here is my way.
And lucky me, I've got another three Beaded Lily beads left!
Materials
White Nymo O
3 or more focal beads
Size 6/0 seed beads
Miyuki #5 triangle beads
Size 11/0 seed beads
Size 15/0 seed beads
Soft Flex beading wire, size medium (0.019 in diameter)
Glass crow beads (8-9 mm)
4 crimps
Toggle set
Tools
Beading needles
Scissors
Wire cutters
Chain nose pliers
Measuring tape
1. Leave a long tail, and using 6/0 seed beads, make a RAW chain about 2 inches long. This is the length that will go between the focal beads, and you will make two of them. Each time you reach an end of the chain, stitch through the final RAW unit a second time. Continue to do this throughout these instructions.
2. Stitch the #5 triangle beads in between each pair of side RAW beads up one side of the chain and back down the other.
3. Embellish the chain by picking up 2 size 15/0 seed beads, a size 11/0 seed bead, and 2 more size 15/0 seed beads. Cross over the RAW unit and stitch through the center bead. Add the first half of the cross all the way down the chain.
4. Stitch your way back up the chain, adding 2 size 15/0 seed beads, stitching through the 11/0 that is already there, and adding 2 more size 15/0s. Stitch through the center beads to anchor each cross. Repeat the crosses on the other side of the chain. I will now refer to the piece as a rope. Leave a long tail on both ends.
5. Make 2 ropes that are about 2 inches long, and 2 ropes that are about 3 inches.
6. Lay out the pieces and prepare to attach them together. I will show you how to do this next week.
This post contains affiliate links: Beadaholique
Copyright 2012 Cyndi Lavin. Not to be reprinted, resold, or redistributed for profit. May be printed out for personal use or distributed electronically provided that entire file, including this notice, remains intact.


Comments